Many users want a tool to manipulate the Atmel MCUs easily avoiding avrdude and the terminal. There are several options for the most commonly systems, some of them are also multi-platform. One of these is Avrfusess, that is widely used. Personally, I dislike it because it’s born under Windows and it’s written in C# and uses the .NET framework, forcing to install and .exe file and the Mono framework on non-Windows systems (for those who don’t know Mono, it’s an open source reimplementation of the .NET framework written from scratch that let you execute .NET apps under Windows/Linux/OSX). The tool that I’m introducing today is different: it’s a native Cocoa app written explicitly for Mac OS X. Its name is AVRFuses.
AVRFuses was originally written in C# on the .NET framework but the author, some time ago, decided to rewrite the app as a Mac OS X only Cocoa application so that now it can only run on Mac OSX but it show a perfect integration in the system. The app is open source: the author provides the binaries (in the form of an installable app) and the sources to compile it under XCode. I’ll show you the installation of the app, leaving the experience of building the app only to the skilled users that want to personalized it. The app is available from this page (at the time of this article, the version is 1.4.8). Just donwload the ZIP file and then copy the app into the Applications folder of you system. Now, launch it by clicking on it (the first time the system will tell you that the app comes from internet and it is not secure to run it, but you can of course ignore this alert and continue anyway).
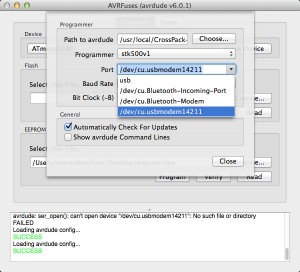
The first step is to set the path to avrdude. This is a crucial point because avrdude is the software that talks with the programmer through the USB line. Usually, users download the Arduino IDE app and use it off the shelves. I personally have the CrossPack app the provides a newer Atmel toochain. In any case, you have to specify the path to the version of avrdude you’re using into “Path to avrdude”. You can click on the “Choose..” button and find the folder that contains avrdude if you’re using CrossPack (usually in /usr/local/CrossPack-AVR – this isn’t a real folder but a symlink to the latest release of CrossPack-) or by specifying the path to avrdude that’s inside the Arduino IDE app: in this case I suggest to enter it manually because the apps are compressed files, not real folders. So usually the path is something similar to /Applications/Arduino 1.0.5.app/Contents/Resources/Java/hardware/tools/avr/etc (to be sure, check if by opening Finder, and then by right clicking on the Arduino IDE app and choosing “show the package content”).
When you have set up the path to avrdude, you have to choose the programmer you’re using (“arduino” or “stk500v1” are valid choices for the ArduinoISP) and then the port the programmer is connected to (in the picture above, an Arduino UNO board with the sketch ArduinoISP is connected to an USB port). Also, set the baude rate to fit your needs (for ArduinoISP, 19200 is OK). Now, press the “Close” button and check if in the terminal monitor you see “Loading avrdude config….” and the green text “SUCCESS”, that indicates that AVRFuses was able to read the configuration file of avrdude. Otherwise, the program will show a red “FAILED” message, so that you have to check the path again.
After the configuration process, you can start using the app to read/verify/write datas on the Atmel MCU you’re using. From the “program” tab you can choose the microcontroller, write an .hex file into the flash or read/write the EEPROM memory of the chip. From the “fuses” tab you can easily read, change and write the fuses of the microcontroller. The fuses are non-volatile registers that set the behaviour of the microcontroller, i.e. they set the clock source, the enable/disable the bootloader memory, they enable/disable the SPI programming etc. (for a more exhaustive article about fuses, read here).
Ok. That’s enough to start exploring the possibilities of the program. Enjoy!
[notice]Keep in mind that by modifying the fuses bits you can brick the microcontroller, this means that you can set the microcontroller in a state that is not usable anymore. I.e., if you set the reset pin to behave like an I/O pin, you won’t be able to program the chip anymore. The only way to recover a bricked chip is to use ah High Voltage programmer, like the AVR Dragon, that is able to send 12V to the reset pin and clear the fuses of the microcontroller). So, be careful![/notice]


