A person that wants to get involved into the prototyping electronics could feel himself lost into the wide sea of the Arduino boards. Let’s have a look at them trying to analyze the different products to choose the one that fits better our needs, if we are looking for a starting board but also if we are looking for a more powerful one.
This article will look at the features of the different Arduino boards to see which notable peculiarities they have.
Let’s start this article refuting a myth: “bigger does not mean better”. Like any product, Arduino boards must be choosen regarding the project we’re realizing and not just reading the technical features. Here are the most relevant boards sold by Arduino.
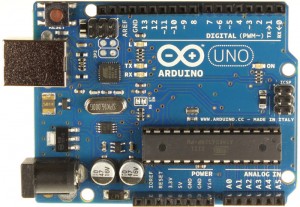
Arduino UNO
This is the Arduino per excellence. The Uno (“one”, in italian language) is the direct successor of the previous Duemilanove (2k9), is a compact board, easy to use and widely supported, with libraries, guides, and examples spread over the internet.
The board is based on the ATmega328P from Atmel, an 8-bits microcontroller clocked at 16 MHz. It communicates with a computer through an USB port that, thanks to the Optiboot, a program called bootloader that permits to make the upload of the user programs (called “sketches”) in an easy way, directly from the development environment. The board has a jack-Japan connector too, to power the Arduino with an external power supply. It works at a voltage of 5V and a wide variety of extension boards (called “shields”) is available to extend the board capabilities, due to the fact that the Uno is retro-compatible with the Duemilanove (and the older Diecimila, the board before the Duemilanove) so that it can use all the shield developed for its ancestor. A little curiosity: the headers are asymmetrics, to avoid inverting the shield when the user install them on the board. We then have to say that the UNO has a huge software support, a lot of libraries and pieces of code exist to help interface the board with LEDs drivers, shift registers, memory chips, I2C devices, analog sensors, etc…
Technical characteristic:
- MCU: Atmel ATmega328P @ 16 MHz
- Flash memory (for user’s program): 32 kB (512 bytes are reserved for the bootloader)
- SRAM memory (for program’s variables): 2048 bytes
- EEPROM memory (to store settings or non-volatile datas): 1024 bytes
- I/O pins: 20, 14 of them are digital I/O and 6 are analog inputs
- PWM: 6 pins
- ADC: 6 channels @ 10 bits
- Operating voltage: 5 V
- Communication: 1x Serial – 1x I2C – 1x SPI
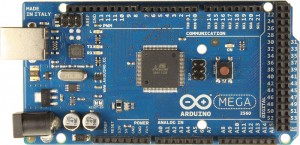
Arduino MEGA2560
The Arduino MEGA2560 has been developed to meet the needs of such users that looked for a board with more memory for sketches and more I/O lines.
The MEGA2560 is based on the ATmega2560 from Atmel, another 8-bits microcontroller clocked at 16 MHz, that offers 8 times the Flash memory of the ATmega328P of the Uno board, and a huge 70 I/O pins, 54 of them are digital I/O lines and 16 of them can be used as analog inputs. Like the Uno, this boards uses an ATmega16U2 that acts as un USB-to-serial converter, so that it can be directly connected to a computer. It work at an operating voltage of 5 V. The layout is similar to that one of the UNO for the left side of the board, on the right side the board is wider, to hold additional headers to connect the additional pins. The compiler is the same due to the fact that the ATmega2560 belongs to the same AVR8 family of microcontrollers, so usually most of the programs written for the ATmega328 can run on the ATmega2560 without modifications. Moreover, the developing team has done a great job trying to maintain on the pin that are shared with the Uno the same functionalities that have on this board, so you’ll find the built-in LED on the same pin D13, the Serial on D0/D1, and so on. Only programs written to use the integrated peripherals of the ATmega328P (like timers, interrupts and similar) in direct mode (manipulating the MCU registers) can not be run on the MEGA2560. The same happens if you try to executed on an Uno a program written to use built-in peripherals of the MEGA2560.
Technical characteristic:
- MCU: Atmel ATmega2560 @ 16 MHz
- Flash memory (for user’s program): 256 kB (8 kB are reserved for bootloader)
- SRAM memory (for program’s variables): 8 kB
- EEPROM memory (to store settings or non-volatile datas): 4 kB
- I/O pins: 70, 54 of them are digital I/O and 16 are analog inputs
- PWM: 15 pins
- ADC: 16 channels @ 10 bits
- Operating voltage: 5 V
- Communication: 4x Serial – 1x I2C – 1x SPI
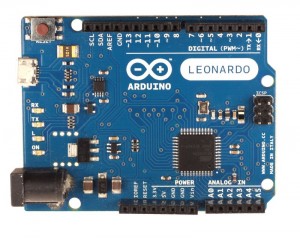
Arduino LEONARDO
The LEONARDO is a new board based on the ATmega32U4 microcontroller.
It differs from the chips of the UNO and MEGA1560 in that it has a built-in USB-to-serial converter so the Leonardo can be directly communicate to a computer without the use of other chips. Moreover, this feature allows the board to be recognized by the operating system as an HID (Human Interface Device) peripheral, like a mouse or a keyboard: in fact, the LEONARDO has specific libraries that are use to emulate such devices so that a sketch written by the user can move the mouse pointer or input a key. Beside this, the LEONARDO has a great compatibility with the UNO: it has the same layout and the same pins arrangement. The only differences concern the serial line, that on the LEONARDO is direcly managed by the chip with its internal converter, so to use the D0/D1 pins as a serial a new class, Serial1, has been created to indicate to the compiler to refer to the line being mapped on those pins, while the old Serial class refers to the line used to send datas from/to the computer. Moreover, the chip has 12 analog inputs, 6 more than the UNO: the extra lines are marked on the bottom side of the boards near the corresponding pins. There are also little differences between the ATmega32U4 and the ATmega328P so that a sketch written for the latter could not run on the former without modifications. Another difference is the USB port: on this board a Micro-USB has been adopted so that you need a different cable, like the one used on the smartphones.
Technical characteristic:
- MCU: Atmel ATmega32U4 @ 16 MHz
- Flash memory (for user’s program): 32 kB (4 kB are reserved for bootloader)
- SRAM memory (for program’s variables): 2.5 kB
- EEPROM memory (to store settings or non-volatile datas): 1 kB
- I/O pins: 20, 8 of them are digital I/O and 12 are analog inputs
- PWM: 7 pins
- ADC: 12 channels @ 10 bits
- Operating voltage: 5 V
- Communication: 1x Serial – 1x I2C – 1x SPI
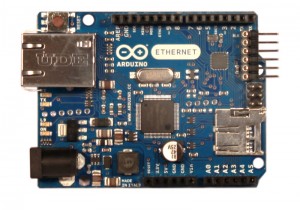
Arduino ETHERNET
The Arduino ETHERNET is a board built for people who needs a product that integrates a programming Arduino board and the Ethernet shield to connect to internet, for that it offers the ATmega328P and the ethernet controller Wiznet W5100, both in SMD format.
An additional module called POE (Power Over Ethernet) is available too, that allow the board to be powered by the Ethernet port. The board can be purchased with or without the module. So in which the ETHERNET differs from the UNO+Ethernet Shield? The former doesn’t have an USB port, replaced by the RJ45 connector, so to program this board you have to use the 6-pins connector available on the left side that the user has to connect to an external USB/converter. Another difference is the Micro-SD slot, that was added to let the user to store a lot of data on an external Flash support. Keep in mind that usually the ethernet solutions are also used to create little web servers: the user has the ability to store the HTML pages in files on the SD and load them when they are need, saving the internal memory of the microcontroller. Apart these differences, the ETHERNET is like an UNO, with a couple of limitations: 4 pins are used to program the board via SPI; 4 pins are used to drive the Micro-SD port; 2 pins are used to communicate with the W5100 controller.
Technical characteristic:
- MCU: Atmel ATmega328P @ 16 MHz
- Flash memory (for user’s program): 32 kB (512 bytes are reserved for bootloader)
- SRAM memory (for program’s variables): 2 kB
- EEPROM memory (to store settings or non-volatile datas): 1 kB
- I/O pins: 20, 14 of them are digital I/O and 6 are analog inputs (see notes above)
- PWM: 6 pins
- ADC: 6 channels @ 10 bits
- Operating voltage: 5 V
- Communication: 1x Serial – 1x I2C – 1x SPI
Arduino DUE
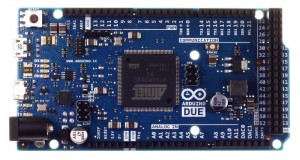
L’Arduino DUE è una scheda molto particolare. E’ un prodotto di fascia alta, destinata ad un’utenza esperta che ricerca prestazioni avanzate. E’ infatti basata sull’Atmel SAM3X8E, un microcontrollore a 32 bit che integra un core ARM Cortex-M3 ed opera a 84 MHz di clock.
Il SAM3X è una MCU che offre una grande varietà di periferiche integrate, a cominciare da un RTC hardware per finire a due DAC, alcune non supportate dalle librerie di sistema come l’Ethernet MAC 10/100. Altra differenza sostanziale è il fatto che essa opera a 3,3 V contro i 5 V delle altre schede. Questo fatto va tenuto a mente quando si collegano dispositivi esterni operanti a 5 V ma anche shield non recenti sviluppati per la UNO e la MEGA2560. Solo gli shield più recenti, sviluppati per il layour R3, possono essere montati sulla DUE senza correre il rischio di danneggiarla. Questo perché con il layout R3 è stato introdotto un pin denominato IOREF che serve ad informare lo shield della tensione a cui lavora la scheda sottostante.
Caratteristiche tecniche principali:
- MCU: Atmel SAM3X8E a 84 MHz
- Memoria Flash (programma): 512 kB
- Memoria SRAM (per le variabili del programma): 96 kB
- Pin di I/O: 66, di cui 54 I/O digitali e 12 usabili I/O digitali oppure come input analogici
- PWM: 12 pin
- ADC: 12 canali a 10 bit
- DAC: 2 a 12 bit
- Tensione operativa: 3,3 V
- Comunicazione: 4 Seriali – 2 I2C – 1 SPI – 1 CAN
La scheda è dotata di 2 porte Micro-USB, una stranezza presto spiegata: nonostante il chip SAM3X8E integri il convertitore USB, per la programmazione è raccomandato l’utilizzo della porta denominata “Programming Port” per via del fatto che il chip ATmega16U2 utilizzato per comunicare con il PC esegue un “hard reset” del SAM3X8E, una procedura che permette una programmazione più sicura rispetto a quella che si ottiene facendo l’upload dalla porta denominata “Native USB port”, che invece avvia la programmazione con un “soft reset”. Se poi il chip va in crash per qualche motivo, il “soft reset” potrebbe non funzionare, e l’uso dell'”hard reset” potrebbe essere l’unico modo valido per poter riprogrammare la scheda. La DUE presenta anche un pulsantino con l’etichetta “ERASE”, premendo il quale si cancella completamente il contenuto della Flash. Altra differenza rispetto alle altre schede è che il bootloader è residente in ROM ed è scritto direttamente da Atmel. Insomma, una scheda particolare destinata ad un’utenza particolare.
Arduino Yún
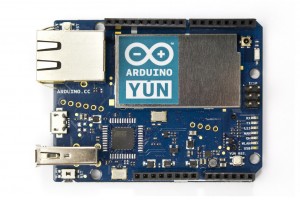
L’Arduino Yún è una scheda arrivata sul mercato nella seconda metà del 2013. E’ un prodotto del tutto nuovo, relativamente alla linea di prodotti Arduino, in quanto monta un microcontrollore ATmega32U4 (lo stesso della Leonardo) collegato via seriale ad un SoC (System-on-Chip) Atheros AR9331, con quest’ultimo che integra la distribuzione Linux Linino (basata su OpenWRT).
La scheda integra anche un controller Wi-Fi, una porta Ethernet, un host USB con porta USB-A, un lettore di Micro-SD, un connettore Micro-USB per la connessione al PC nonché i soliti header classici di tutte le schede Arduino. La Yún è in effetti una Leonardo “espansa”: grazie ad un “bridge” (un “ponte”) software creato tramite connessione seriale, il sistema Linux che gestisce le periferiche avanzate della scheda comunica con l’ATmega32U4, che invece sovrintende alla gestione delle linee di I/O ed alla comunicazione con il computer. La ricchezza di possibilità offerte dalla Yún richiede però un maggior impegno da parte dell’utente per sfruttare appieno la scheda: egli, infatti, deve preparare 2 programmi, uno per l’ATmega32U4 ed uno, scritto in un linguaggio di programmazione supportato da Linux, per l’AR9331. Di serie, Linino fornisce una libreria in Python per la gestione delle periferiche collegate all’AR9331. Gli sketch per l’ATmega32U4 si scrivono, invece, sempre tramite IDE.
Caratteristiche tecniche principali:
- MCU: Atmel ATmega32U4 a 16 MHz
- Memoria Flash (programma): 32 kB (4 kB sono riservati al bootloader)
- Memoria SRAM (per le variabili del programma): 2,5 kB
- Memoria EEPROM (per salvataggio di impostazioni o altro): 1 kB
- Comunicazione: 1 I2C, 1 Seriale, 1 SPI
- Tensione operativa: 5 V
- SoC: Atheros AR9331(MIPS) a 400 MHz
- Memoria Flash (contiene la distribuzione Linux): 16 MB
- Memoria DRAM (per l’esecuzione dei programmi): 64 MB DDR2
- Ethernet: IEEE 802.3 10/100 Mbs
- WiFi: IEEE 802.11b/g/n
- USB: USB 2.0 host/device
- Tensione operativa: 3,3 V
- Pin di I/O: 20, di cui 8 I/O digitali e 12 usabili I/O digitali oppure come input analogici
- PWM: 7 pin
- ADC: 12 canali a 10 bit
- Tensione accettata sui pin di I/O: 5 V
Come detto, la comunicazione fra i 2 chip è realizzata mediante interfaccia seriale usando i pin 0 e 1 della scheda. Se si vuole comunicare serialmente con qualche altro dispositivo esterno, bisogna ricorrere alla libreria SoftwareSerial, fornita di serie con l’IDE di Arduino, ed utilizzabile su qualunque coppia di pin della scheda. Il bridge software permette lo scambio di dati fra l’ATmega32U4 e l’AR9331: il team di Arduino ha messo a disposizione una pagina in cui illustra le funzioni del bridge disponibili nell’IDE. La periferica Wi-Fi va configurata prima dell’utilizzo, ciò va fatto tramite ethernet collegandosi con un browser ad una particolare pagina in locale. Altro software può essere installato sulla distribuzione Linux grazie al gestore di pacchetti opkg presente in Linino. E’ comunque disponibile una guida alla scheda che raccoglie queste ed altre informazioni.
Arduino MICRO
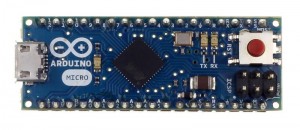
Di tutte le schede secondarie prodotte col marchio Arduino (Mini, Pro, LilyPad, Nano ecc…) voglio citare l’Arduino MICRO, anch’essa arrivata di recente sul mercato.
Progettata in collaborazione con Adafruit (come ricorda la scritta sul lato inferiore della scheda), questa MICRO tiene fede al proprio nome essendo una scheda veramente miniaturizzata: grazie all’uso dell’ATmega32U4, non serve un convertitore seriale/USB per collegarla al computer. Le sue dimensioni sono così di 4,8 x 1,77 cm. Tutte le linee di I/O del chip sono riportate sui connettori inferiori, risultando una LEONARDO a tutti gli effetti.
Caratteristiche tecniche principali:
- MCU: Atmel ATmega32U4 a 16 MHz
- Memoria Flash (programma): 32 kB (4 kB sono riservati al bootloader)
- Memoria SRAM (per le variabili del programma): 2,5 kB
- Memoria EEPROM (per salvataggio di impostazioni o altro): 1 kB
- Pin di I/O: 20, di cui 8 I/O digitali e 12 usabili I/O digitali oppure come input analogici
- PWM: 7 pin
- ADC: 12 canali a 10 bit
- Tensione operativa: 5 V
- Comunicazione: 1Seriale – 1 I2C – 1 SPI
Un regolatore sulla scheda permette di alimentarla con un alimentatore esterno. La programmazione può essere fatta utilizzando anche il connettore ICSP integrato.
Quale fa per noi?
Alla fine dell’analisi, abbiamo più dati per scegliere la scheda correttamente:
- stiamo iniziando ora? cerchiamo una scheda di uso generale, con un ricco parco librerie e la possibilità di accedere ad un numero consistente di shield di espansione? Allora la scelta giusta è la UNO. E’ facile usarla, è la scheda per la quale è stato scritto il maggior numero di guide inrete, gli shield permettono di aggiungere funzionalità extra senza ricorrere al saldatore, uno strumento che spesso è visto di cattivo occhio dal neofita. Inoltre il chip ATmega328P è in formato DIP28 (Dual In-line Package a 28 pin) e lo si può sostituire facilmente in caso lo si bruci per errore (può capitare). La possibilità di rimuovere il chip permette anche di creare versioni standalone dei propri progetti dove il microcontrollore programmato può essere estratto e montato su un circuito e sostituito sull’Arduino da un altro nuovo (con opportuno bootloader precaricato) in modo da riusare la schedina.
- Vogliamo comandare il computer? cerchiamo un modo facile per spedire comandi al sistema tipo simulare la pressione di un tasto o il click di un mouse? Allora la scheda giusta è la LEONARDO. Grazie al fatto che il suo microcontrollore integra l’hardware necessario per comunicare via USB col sistema operativo, essa è vista da quest’ultimo come una periferica HID e può quindi essere utilizzata come periferica di input. La Arduino ESPLORA, una scheda che replica un gamepad, è basata proprio su un ATmega32U4. A parte questo, la LEONARDO è compatibile con la UNO per molti aspetti e molto del software e degli shield per la UNO girano anche su di essa.
- Cerchiamo una scheda con un sacco di linee di I/O e con tanta memoria per il nostro programma? Allora la MEGA2560 è scheda da acquistare. La MEGA2560 ha 70 pin, divisi fra ingressi digitali e analogici, e può quindi risultare indispensabile in caso si realizzino progetti dove l’Arduino deve poter dialogare con dispositivi che richiedono diverse connessioni (esempio: display). La MEGA2560 offre inoltre 256 kB di Flash, 8 volte lo spazio offerto dalla UNO, permettendo quindi di scrivere programmi molto complessi e che usano molte librerie extra. La MEGA2560 può inoltre far girare molto del software scritto per la UNO, a meno che non siano usate periferiche specifiche dell’ATmega328P.
- Stiamo cercando un microcontrollore molto potente e capace di eseguire una grosse mole di calcoli per unità di tempo? L’Arduino DUE è la risposta. La DUE è una scheda nata per venire incontro alle esigenze di un’utenza di tipo avanzato, che cercano un prodotto della famiglia Arduino ma che offra potenza maggiore. Il target della DUE è ad esempio l’utilizzo in sistemi di volo autonomo in progetti di quadricotteri oppure di interazione con l’ambiente per robot semoventi. La compatibilità con le altre schede è molto limitata, praticamente ridotta alle funzioni base del core: l’architettura a 32 bit e le periferiche integrate nel SAM3X8E ne fanno un prodotto del tutto diverso.
- Non ho citato la ETHERNET e la MICRO. Sono schede particolari, richieste solo da una particolare utenza. La ETHERNET è in pratica una UNO con lo shield ETHERNET integrato, è comoda per risparmire dei soldi ma per contro si paga il fatto di dover usare un programmatore esterno. La MICRO è comodissima per progetti in cui la compattezza deve essere al primo posto dei punti da rispettare, da ricordare che è però basata su un ATmega32U4 e non sull’ATmega328P della UNO per cui particolari librerie potrebbero non funzionare.
- A chi serve la Yún? A chi vuole una scheda che possa offrire le funzionalità di una scheda base con in più la connessione Wi-Fi offerta con l’acquisto di un apposito shield. La Yún è però una scheda che mi sento di consigliare solo a chi ha un minimo di dimestichezza con l’ambiente Linux e Python: per la programmazione dell’AR9331 il brige offerto è per questo linguaggio, e Linux richiede una certa dimestichezza con il terminale.
Conclusioni
Se state per acquistare la vostra prima scheda, prendete la UNO: è fatta apposta per i principianti. E’ facile da usare, tollera i 5 V che è la tensione della logica TTL, si può sostituire il suo chip in caso di danneggiamento o per montarlo in standalone. Sempre se siete neofiti, non fatevi prendere dalla bramosia di comprare la DUE pensando che “più grande è meglio”: la DUE non è una scheda pensata per iniziare ma per chi ha già una buona base e sa cosa sta maneggiando. Già il fatto che la sua tensione operativa sia di 3,3 V causa non pochi problemi ai neofiti, a causa del fatto che molti dei prodotti in circolazione sono stati pensati per la UNO ed i suoi 5 V. Solo recentemente il team di sviluppo ha introdotto il layout R3 che, grazie al pin IOREF, permette allo shield compatibile di adeguare la tensione a quella della scheda. Ma per gli shield di vecchia concezione bisogna controllare in anticipo. Inoltre molte delle librerie in circolazione non funzionano con la DUE. Anche in questo caso bisogna controllare in anticipo.


